|
<< Click to Display Table of Contents >> Client Details |
  
|
|
<< Click to Display Table of Contents >> Client Details |
|
The Toolbar:
•Duplicate will copy the current client's Family Name, Address, Phone and Contact details into a new client record and is useful when, say adding a husband and wife or several siblings at the same time
•The Select Claim box can be used to quickly find a claim record for the selected client without needing to switch to the Claims work-area
•Export and Import can be used to exchange information with Reckon
•Send Message is used to send an email or SMS message to the client, provided an email address and/or mobile phone number is available
•Allocating a Company/Employer in the Identifiers section for a non-HSP client will classify the client by default as a Company client
•Allocating an Insurer classifies the client as an Insurance client by default
The Work Area:
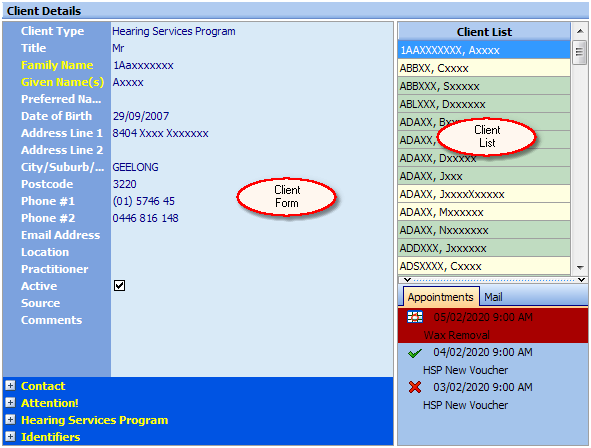
The Client Details work area consists of two panels
1.The Client Form, and
2.The Client List
1.Click on the Client Form
2.Press the Insert key on the keyboard, or click Insert New Record on the work area toolbar
3.Enter the client's details and press Ctrl+S on the keyboard, or click Save Changes on the work area toolbar
1.Click on the Client Form
2.Press Ctrl+Insert on the keyboard, or click Edit on the work area toolbar
3.Modify the client's details and press Ctrl+S on the keyboard, or click Save Changes on the work area toolbar
Basic client details are entered in the top section of the Client Form
•If you enter an e-mail address for a client you will have the option of distributing mail-merge letters electronically
•Clients who are no longer active eg have moved away, relocated or died, should have the Active box unchecked; inactive clients are excluded from automated maintenance claim processing
•The Attention! section is used to set a notification or reminder flag. This feature can be used to notify all users that there is something about the selected client which they may need to know. For example, it may be something like a reminder to reception staff that the client prefers tea to coffee, or it may be something as important as notifying all staff that the client is HIV-positive.
For confidentiality reasons, the Attention! section always collapses whenever the selected client is changed, or the data is refreshed
![]()
If a message is entered the Attention! section changes colour and a flag appears in the client navigator. Deleting the message forces the Attention! section to revert to the normal colour scheme
![]()
The Contact section is used to store alternative contact information e.g. the client's caregiver

The Hearing Services Program section holds information used to prepare claims for the Hearing Services Program. If a client has an HSP Voucher Number entered, HearAid will offer to update the Left and Right 3-FAHLs (3-Frequency Average Hearing Loss) whenever an audiogram is saved in Tests|PTA.

•HSO Access Permission can record whether a client has given the user to access their details in the Hearing Services On-Line Portal. Written confirmation forms can be scanned and stored in Documents
•The HSP Maintenance Period Begins is normally the anniversary of the first fitting date, or the refitting date, or the service date of the last maintenance item claim for the client and is the start of the 12-month HSP Maintenance Period; no maintenance items can be claimed in the period between this date and the HSP Maintenance Period Expires
•The HSP Maintenance Period Expires date marks the end of the HSP Maintenance Period
•Still Eligible should be un-ticked if a client loses HSP service eligibility
•Binaural Devices will normally be set automatically from claim data. However, in those cases where a client who was previously fitted binaurally but no longer uses one aid, this box should be un-ticked to ensure the correct maintenance and adjustment items are claimed
•Rehab Plus status can also be tracked here
•If a client has declined an invitation to participate in Rehab Plus, or is ineligible, select Declined/Ineligible
•If a client has accepted an invitation to participate in Rehab Plus but has not yet attended any groups, select Accepted/Waiting. The HSP Rehab Plus Waiting List Quick Report uses this setting to list clients waiting for groups
•Once a Rehab Plus claim has been submitted, HearAid will automatically set Rehab Plus to Completed
•Relocation Code, Relocation Date and Reason for Relocation can be used to track client relocations to and from your practice; changes in this data is also stored in the Relocation Log and can be used as an analytical tool. Relocation Codes and Relocation Reasons can be customised to suit your needs
The Identifiers section stores references to various other ID codes and identifiers:

•Binaural Devices will be automatically updated as HSP Claims and Fitting records are added and is used in automated maintenance claim preparation and the EARtrak module
•Government numbers
•Employers and insurance companies
•The Insurance Claim Reference is also used by the EARtrak module
•The client's doctor
•An External ID such as a hospital medical record number
The Client List provides a quick way to move through the client table
•Begin typing a client's name and the list will scroll as you type

Program performance can be optimised by hiding the Client List. To hide/show the Client List, right-click on the data card and click Hide Client List

When the Client List is hidden, the Client Details page will change to look like this

When you delete a client by clicking the Delete button on the toolbar, HearAid automatically gathers all of the client's data, including notes, fittings, tests, etc and copies it into a zip file stored in the Client Archive folder. If for some reason you need to recover the data, use the Tools|Import function to navigate to the ..\HearAid\Client Archive folder, then select the zip file named after the client and click the Import Data Now button
A list of the client's appointments is available at the bottom of the Client List: drag the splitter at the bottom of the list upwards to display the list. The list displays the appointment status icon and the appointment category as a quick guide. Double-clicking an appointment will display the appointment calendar for the date of the appointment

Also listed on the Mail tab are any mail-outs generated from the Quick Reports|Mail Merge menu
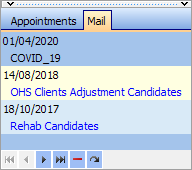
Devices that have been loaned or trialled are shown on the Loans tab

