|
<< Click to Display Table of Contents >> Fittings |
  
|
|
<< Click to Display Table of Contents >> Fittings |
|
The Toolbar:
The Work Area:
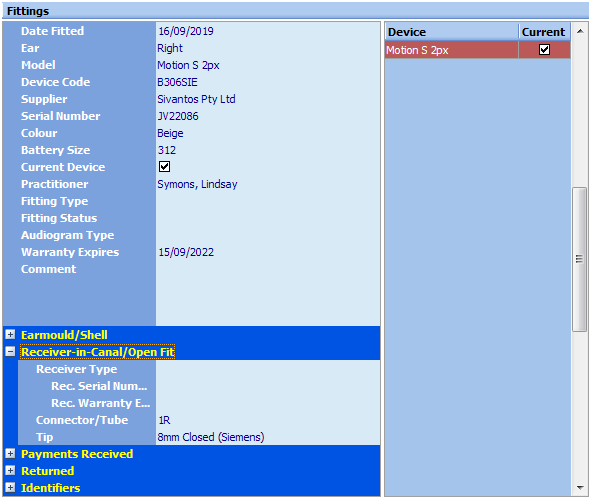
1.Click on the Fitting form
2.Press the Insert key on the keyboard, or click Insert New Record on the work area toolbar
3.Enter the Date Fitted. By default, HearAid will enter the current date
4.Select the ear fitted, or Remote/ALD if appropriate
5.Select a Supplier
6.Select a Model or Device Code (whichever you prefer; HearAid will update the other box appropriately)
7.Enter the device's serial number
8.Enter a colour, if required
9.Enter a battery size; the default value will be size entered in the devices table
10.A new fitting will automatically be tagged as Current Device. Uncheck the Current Device box if the client is using a different device in that ear
11.Enter the practitioner who was responsible for the fitting
12.Fitting Status and Audiogram Type are used with the optional EARtrak module
13.The default Warranty Expires date will be calculated based on the warranty period value entered in the devices table
14.Additional notes specific to the fitting can be entered in Comment
15.Press Ctrl+S on the keyboard, or click Save Changes on the work area toolbar
Note: If you enter a Fitting Claim for an HSP client the program can automatically add fitting records for each device in the claim and you do not need to add Fitting records manually; this behaviour can be set in Tools|Options|Auto-Create Fittings From Claims
To Edit an existing fitting:
1.Click on the Form
2.Press Ctrl+Insert on the keyboard, or click Edit on the work area toolbar
3.Modify the details and press Ctrl+S on the keyboard, or click Save Changes on the work area toolbar
•If an aid is Returned for Credit the return details can be entered in the Returned section
